

Tuesday, August 18, 2015
GW Cupcakes
George Washington University inspired German chocolate cupcakes for the staff retreat bake off!

Monday, November 3, 2014
Birdcage, baptism, and Disney
I've been so busy and I haven't posted anything recently. Here are some projects I completed in the last few months.


.jpg)

Sunday, March 23, 2014
Reese's Cake
I've had many inquiries about how to make my peanut butter chocolate cake.

I wonder why. Below is a very lengthy explanation of recipes, process, and tricks to making your own version of this cake. You can add or remove anything you want.
Cake
If you’re an over achiever, use this recipe
to make chocolate cake from scratch. I’ve used it and liked it. If someone is
paying me to make a cake, I use this recipe. Remember though: you’ll also be
making two kinds of frosting from scratch and all three will take most of the day when you account for the hurry up and wait portions of the process (baking, cooling, setting, etc.)
If the cake is for a dinner party or I’m short on time, I
use box mix. These days, it tastes just
as good as most white or chocolate cake recipes I’ve had (no one ever
compliments the scratch recipe more than the box mix) and box mix has the added
benefit that it’s nearly fool proof. I can not vouch for anything other than chocolate or vanilla cake. I've used Pillsbury and Betty Crocker brands and like the results with both.
Regardless of your approach (scratch vs. box) here are a few
tips I’ve picked up (mainly the hard way):
- Use cake pans that have straight sides. Slanted edges do
not produce straight cake sides. You can get pans off amazon or at a craft
store (check for coupons online) for pretty cheap, probably about $20.
-If you’re using box mix, buy two boxes; if you’re making
the scratch version, double the recipe. You want to fill up both cake pans about 2/3
full. Some might think that is too much batter. But it will help when you level the cake tops later and this allows the cake to reach an impressive height of 4-5 inches.
-I don’t care what your recipe says; I never use butter and
flour to prep my pans. It has never worked for me. I always use vegetable oil
spray to cover my pans and I spray it on quite liberally. The second key
component of pan prep is lining the bottom of your pan with parchment paper. I
have never had a cake release from a pan cleanly without parchment paper in the
bottom. You can trace the bottom of your pan on a piece of parchment and then
cut it out and place it in the bottom of the pan. Spray oil under and on top of
the paper.
-My 8 inch cakes took 50 minutes to bake through. I use a
knife to check for doneness. A tooth pick won’t really reach the middle of
these pretty tall cakes. Once your cakes are done baking, allow to cool in the
pan. Do not remove your cake from your pan yet.
Make your ganache:
Chocolate ganache
8 ounces bittersweet or semisweet chocolate, chopped (I use Ghirardelli
baking chips)
2 tablespoons light corn syrup
1 ½ ounces unsalted butter
1 cup heavy cream (half pint)
Place the 8 ounces of chopped chocolate in a bowl with
the corn syrup and 1 ½ ounces of butter.
Heat the cream until it just begins to boil. Remove from
heat and pour over the chocolate. Let stand one minute, then stir until smooth.
The ganache will be very liquid while still warm. To
assist the thickening process, put it in the fridge for 30 minutes. Remove and
let sit until room temperature. It will be thick yet spreadable.
Peanut butter
frosting
1 stick unsalted butter, room temp
2 tablespoons vegetable shortening
1 cup creamy peanut butter, or more if you'd like
16 to 32 oz powder sugar, to taste
1/4 to 3/4 cup milk, to taste
Note: stand mixer incredibly useful for this, as mixing frosting
strains handheld mixers’ engines
Cream butter and shortening in mixed on high until fully
incorporated. Add peanut butter and mix. Add 1/4 cup milk, and 16 oz of powder
sugar. Turn the mixer on the lowest setting and take cover for the obligatory sugar cloud. You can also cover your mixer with a large towel to prevent the sugar cloud. Once powder sugar has been
absorbed, increase speed of mixer to medium-high. Taste. Too dry or thick? Add
more milk. Not sweet enough? Add more sugar. Not peanut buttery? Add more. This portion is really about your taste preference. The ganache is going to be very bitter and it is a nice contrast with a sweet peanut butter frosting. Set aside with a towel over the top.
Let's put it all together:
Assembly Ingredients:
Reese’s Miniature Peanut Butter Cups
Mini chocolate chips
Cake stand, board, or large serving plate
Before removing cakes from pans, take the longest knife you own (samurai swords excluded) and use the top edge of your pan as a level guide to slice the “muffin
top” dome off the top of your cake. This is why I like using a lot of cake batter, so that the cake puffs up so high that you can get nearly a perfectly level top by cutting off the excess, which you can discard or snack on.
Turn cakes
out, inverting cakes onto a cutting board or mat. You want to leave the cakes
upside down, where the side that you sliced the cake dome off of is facing down.
Place a hefty dollop of butter cream on cake stand/cake board/plate. Place one
inverted cake on top of frosting (which will act like glue and keep the cake in
place).
Spread a generous amount of frosting on top of the cake. This is going to be your middle layer. Rough chop about 10 Reese’s miniature cups. Sprinkle them on top of peanut
butter frosting and press them into the frosting (so the next cake layer will
sit level). Optional: pour a bit of ganache on the top of the frosting and peanut butter
cups, this will cut some of the sweetness of the frosting and the peanut butter cups.
I took the pic before the ganache.

Place the second cake on top, cut side down (same as the first one). Add more peanut
butter frosting to the top of the new cake layer. Spread to the edge of the
cake. After a few minutes, you can take a Viva paper towel or a piece of
wax/parchment paper and place it on top of the peanut butter frosting. Use your
hand to smooth the top of the frosting, sort of like ironing it. Be delicate.
Use an offset spatula to carefully smear the ganache on the
side of the cake. Having a turntable makes this process easier. I have a tool to add texture to the ganache, but if you have a knife that has a lot of serrated teeth, you might be able to achieve a similar look by holding it teeth side
toward the ganache and spinning the turn table.
Take a heap of mini chocolate chips in your palm, press them
into the side of the cake. Most will stick to the ganache but several will not, so
I like to do this over a large cookie sheet to catch all of the chips that will fall off. You can add the chocolate chips as far up as you want on the side of the cake. I like to go
about half way.
If you have a piping bag, I used a 1M Wilton piping tip to
make the swirly rosettes on the top of the peanut butter frosting. (About 12 rosettes for an 8 inch cake). Place a mini
Reese’s on top of each swirl.
The ganache you are piping will start to melt while you are
holding it in the piping bag. I place the finished cake in the fridge so the
ganache will set up again. After it has firmed up, you can leave it at room
temperature until you are ready to serve. After first serving, refrigerate, as
ganache is cream-based. Should last up to 3 days in the fridge.
Now your task is not to eat it before company arrives!
This cake is a more advanced version of the first cake I ever made, a little more than 2 years ago. How the time as flown by. Chocolate peanut butter is still my favorite.

Friday, February 7, 2014


Tuesday, November 26, 2013

Sunday, November 3, 2013


Sunday, April 14, 2013

Monday, April 8, 2013

Monday, March 18, 2013

Passion Fruit Curd and Blackberry Butter Cream Cake
The passion fruit curd turned out AMAZING. The black berry butter cream did not have as strong a flavor as I remembered. Better luck next time.

Thursday, March 14, 2013
Big news!
Happy International Pi Day! The Harry Potter birthday cake I made in 2010 is featured on the blog GeekCrafts.com, along with some other oh-so-nerdy sweets. Check it out! Sweet Cakes DC is honored to be in such company as NYC's Pink Cake Box, and WETV's Amazing Wedding Cakes' Christopher Garrens, two bakeries I very much admire. A good day for Sweet Cakes DC!
I realize I haven't been posting much lately. That's because I haven't made a cake since December! I have been doing a lot of cupcakes and have experimented with many new recipes. Here are pictures of some of the cupcakes I've made recently.


Rest assured, I will be doing some cakes in the near future. I have not given up on them, cupackes have been a great departure to tinker with some new recipes. This weekend, I'll be making a copycat of my wedding cake (in flavor only). Fluffy Thoughts bakery in McLean, Virginia, made my 2011 wedding cake. They introduced my husband and I to a mindblowing flavor combination that we've been craving ever since: My Passion - white cake with passion fruit curd filling and blackberry butter cream. It is to die for, and I hope my version turns at least somewhat as amazing as theirs.
More to come!
I realize I haven't been posting much lately. That's because I haven't made a cake since December! I have been doing a lot of cupcakes and have experimented with many new recipes. Here are pictures of some of the cupcakes I've made recently.

Thanksgiving Cupcakes (L to R): Apple pecan spice cake with a brown butter frosting, chocolate peppermint, and pumpkin cinnamon cream cheese.

Holiday Party Cupcakes (L to R): chocolate orange, vanila almond, and gingerbread.

Valentine's Day Cupcakes (L to R): s'mores, chocolate raspberry, and red velvet.
Rest assured, I will be doing some cakes in the near future. I have not given up on them, cupackes have been a great departure to tinker with some new recipes. This weekend, I'll be making a copycat of my wedding cake (in flavor only). Fluffy Thoughts bakery in McLean, Virginia, made my 2011 wedding cake. They introduced my husband and I to a mindblowing flavor combination that we've been craving ever since: My Passion - white cake with passion fruit curd filling and blackberry butter cream. It is to die for, and I hope my version turns at least somewhat as amazing as theirs.
More to come!
Saturday, December 8, 2012

Saturday, December 1, 2012


Sunday, October 28, 2012
Dora Birthday Cake with Boots and Swiper
Dora and Boots are trying to make it to the party tent! But Swiper is up to no good....

This cake was for a friend with two twins who needed their very own cakes:

Tuesday, October 16, 2012

Thursday, October 4, 2012


Wednesday, July 4, 2012
Lion Cake
My last cake of the summer. Pretty cute, for a very cute kid. Signing off until September/October.


Friday, June 1, 2012


Monday, May 21, 2012

Saturday, May 19, 2012
Dr. Who Wedding Cake(TARDIS)
Wedding cake for my friends who are fans of Dr. Who. This doohickey is apparently called a TARDIS.


Saturday, April 21, 2012
Green M&M Cake
As green would say, "Look at me... fabulous!"

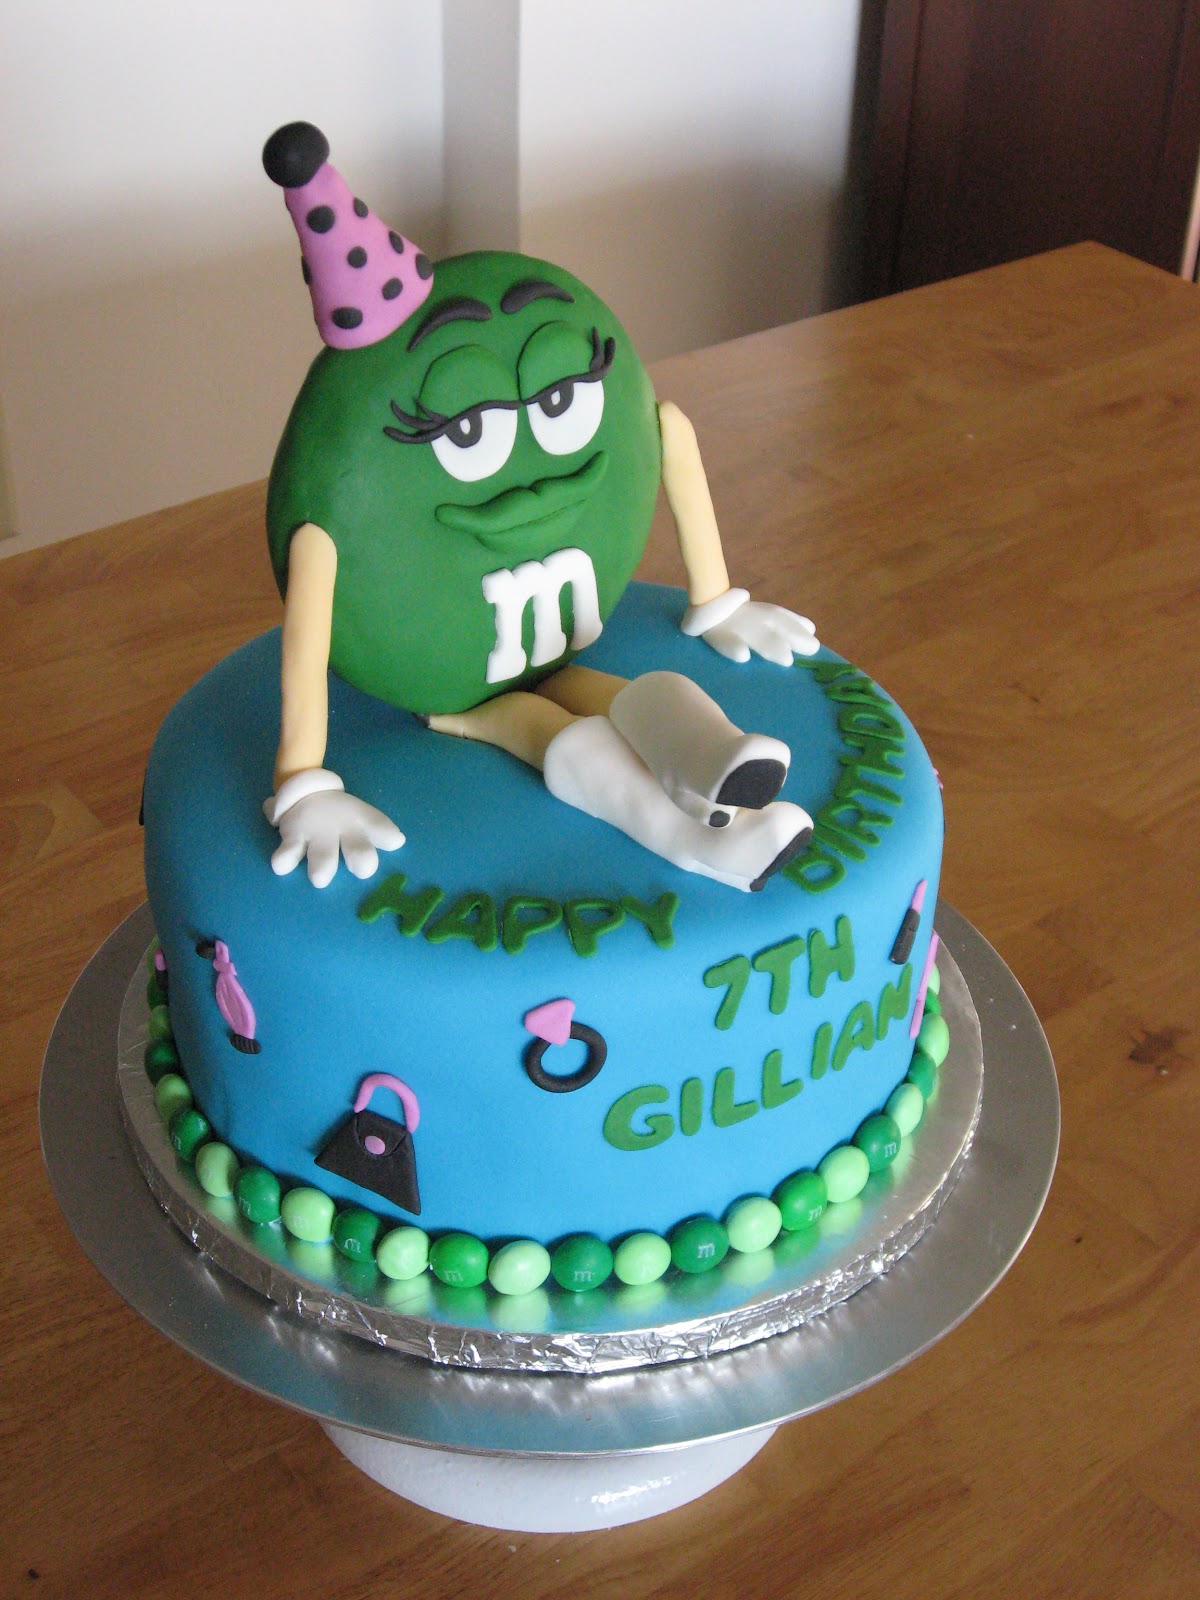
And the sketch the cake was based on. Had to change how green was positioned for some practical reasons, but otherwise, it cam out exactly as I though it would!

Saturday, April 14, 2012


Wednesday, April 4, 2012


Subscribe to:
Posts (Atom)